Search our inventory of drains, drain parts, safety and roofing equipment, and accessories. Shop Now.
Search our inventory of drains, drain parts, safety and roofing equipment, and accessories. Shop Now.
Below are detailed instructions on how to properly set up and operate the Leister TRIAC Drive semiautomatic hot-air welder. Prior to starting, we recommend reading through the manufacturer's warnings and cautions listed within the Operating Manual. If you have any questions, or need clarification, please call us at 800-635-0384.
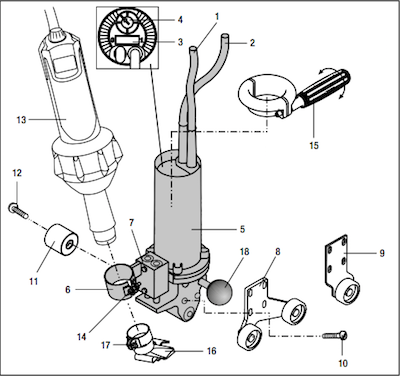
Push handle (15) onto drive unit (5) up to the required setting. Lock the handle (15) in place by turning it clockwise.
Connect the double (8) or single (9) support carrier to the drive unit (5) using the four provided fixing screws (10).
Connect the pressure roller (13) to the drive unit (5) using the fixing screw (12).
 Push the TRIAC AT or TRIAC ST (13) into the hot-air blower holder (6). The heat gun must be pushed in so that the distance between the end of the protective tube and holder is 10 mm (see image to the right). Tighten the fixing screw (14) to secure the TRIAC in place.
Push the overlap welding nozzle (16) onto the end of the TRIAC's protective tube. Tighten the nozzle's fixing screw (17) to secure it in place.
Loosen the four fixing screws (10) that attach the support carrier (8 or 9).
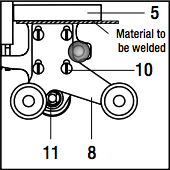 Feed in a small section of the material to be welded between the drive unit (5) and support carrier (8 or 9) (see image to the right).
Move the support carrier (8 or 9) up to the material to be welded.
Retighten the four support carrier fixing screws (1).
Remove the material to be welded.
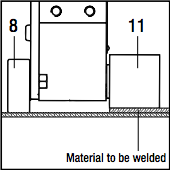
Lay a piece of material to be welded on top of another. Straddle the overlap seam with the TRIAC Drive by placing the support carrier wheels on the lower sheet, and the pressure roller (11) on the upper sheet. Check that the pressure roller (11) lies flat against the upper sheet (see image to the right).
 Loosen the TRIAC holder's (6) adjusting screws (7).
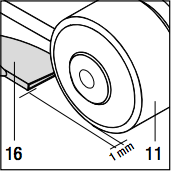
Use the TRIAC hand gun handle (13) to line the overlap welding nozzle (16) parallel with the material to be welded. It should extend 1 mm beyond the outside of the pressure roller (11).
Retighten the holder's (6) adjusting screws (7).
Start up the Leister TRIAC AT or ST.
 Adjust the air temperature by means of the potentiometer located on the end of the heat gun.
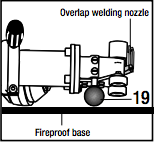
Place the TRIAC Drive in standby position by laying it on the tool stowage bar on a fireproof base (see image to the right).
Allow the heat gun to warm up for approximately 4 minutes.
Once warmed up, turn on the Drive Motor's (5) main power switch (3).
Use the potentiometer (4) to adjust the welding speed according to the requirements of the material to be welded.
Make sure the pressure roller (11) and overlap welding nozzle (16) are clean before positioning the tool.
Position the overlap welding nozzle (16) between the overlapped membrane (see image to the right).
Guide the tool at even pressure by means of the handle (15) and drive unit (5). IMPORTANT: The TRIAC should not be used as a handle during the welding process. You may accidentally misalign the nozzle.
At the end of the weld, move the tool away from the seam.
Once done welding, clean the overlap welding nozzle (16) with a wire brush.
Turn down the heat on the TRIAC but keep to blower running. Allow it to cool down approx. 5 minutes.
Switch off the tool and disconnect the power cord.