Search our inventory of drains, drain parts, safety and roofing equipment, and accessories. Shop Now.
Search our inventory of drains, drain parts, safety and roofing equipment, and accessories. Shop Now.
The UNIROOF AT's control panel is comprised of:
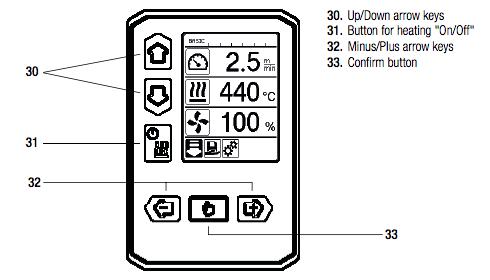
The function keys serve multiple purposes depending on whether you're viewing the display or using the menu. Below is an overview of the function buttons and what action each performs.
| Symbol | Designation | In Work Display |
In Menu Selection |
 |
Arrow Keys Up/Down | Switching between symbols (change the sequence) | Switching between menu selection and work display. |
| Heating Button On/Off | As symbol, it shows the changeover to the cool-down process and from the start display into welding mode. | ||
 |
Press the Minus/Plus arrow keys | ||
| Briefly | Sets the required setpoint in 0.1 m/min, 5°C or 5% steps | Changing the position / Switching the menu | |
| Press and Hold | Sets the required setpoint in 10°C or 10% steps | Changing the position / Switching the menu. | |
 |
Button Confirm | The set value is applied and show in the menu selection | The desired function or the menu is executed. |

The Status Display is subdivided into a left-hand and right-hand area.
Profile Name
Voltage
 |
General warning note |
 |
Key block is activated |
 |
Heating is switched on |
 |
Note regarding undervoltage |
 |
Note regarding overvoltage |
During operation, the setpoints of the welding parameters (drive in m/min or ft/min, temperature in degrees Celsius or Fahrenheit, air volume in percent and information notes are displayed as required (see Application Mode: Displaying current values).
Use the Up/Down arrow keys (30) to switch between the welding parameters and adjust the values individually with the Minus/Plus arrow keys (32).
The following icons can appear in this display area:
| Symbol | Meaning |
 |
Symbol drive / welding speed (ft/min) |
 |
Symbol air temperature (°F) |
 |
Symbol air volume (%) |
 |
Information notes on work display |
 |
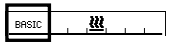
Welding temperature too low, heat-up process Up arrow and progress bar show that the desired higher temperature has not yet been achieved. The flashing number above the progress bar designates the currently achieved actual value. The value to the right of the bar shows the nominal value of the selected welding profile or of the individual setting. |
 |
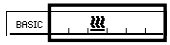
Welding temperature too high, cooling-down process Down arrow and progress bar show that the desired lower temperature has still not been achieved. The flashing value above the bar designates the currently achieved value; the value to the right of the bar shows the nominal value of the selected welding profile or of the individual setting. |
 |
Symbol for Standby mode |
 |
Symbol for Cool Down mode |
 |
Symbol for hardware error message The device is no longer ready for operation. Contact an authorized Leister Service Center. |
 |
Symbol for Hardware error message (heating element is defective) The device is no longer ready for operation. Contact an authorized Leister Service Center. |
 |
Symbol for Overtemperature warning message. Allow the device to cool down. |
Available menus are selected with the control panel arrow keys (30, 32).
| Symbol | Meaning |
| Switching drive on/off | |
| Select saved welding profile | |
| Adjust settings | |
| Go to initial screen (home) | |
| |
Go to previous view / one level back |
| Rest to factor setting (reset) | |
| Call up Service mode (only with password) | |
| Edit current settings / current profile | |
| Save current settings / current profile | |
| Delete current settings / current profile | |
| Initiate cooling process |